Android图像绘制
本文介绍一下Android图像绘制的一些基本功能。在游戏开发、图像编辑等都会使用到。
1、镜像
这里介绍两种方法
-
方法一,使用矩阵的方式(3x3)矩阵:
1)先使用postScale的方式将图片以点(bmpW/2,bmpH/2)为中心,以x=bmpW/2为对称轴翻转;
2)使用postTranslate,将图片移到(x,y)坐标
Matrix matrix = new Matrix();
matrix.postScale(leftOrRight, 1, bmpW/2, bmpH/2);//前两个是xy变换,后两个是对称轴中心点
matrix.postTranslate(x, y);
canvas.drawBitmap(bmpLuffy[0], matrix, paint);
-
方法二,画布翻转
调用画布方法save()和restore(),在中间将画布旋转、绘制
canvas.save();
canvas.scale(-1, 1, x + bmpLuffy[0].getWidth() / 2, y + bmpLuffy[0].getHeight() / 2);
canvas.drawBitmap(bmpLuffy[0], x, y, paint);
canvas.restore();
注意如下问题:
对于其中的bmpW和bmpH是指所用图片的宽高,需要使用图片bmp.getWidth()和bmp.getHeight()获取,
不能使用PC上看到的大小,否则可能会出现错位!(PC上是像素值,drawable里面不一样的)
2、缩放
注意android中图像在画布上放大缩小时,图像的边框大小没有改变!
原图如下:
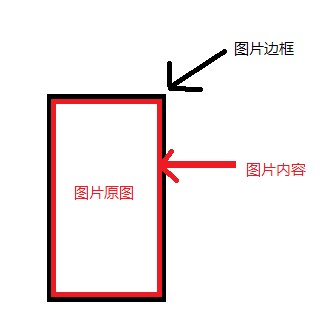
放大后:原来图片的边框没有改变,位置依旧!
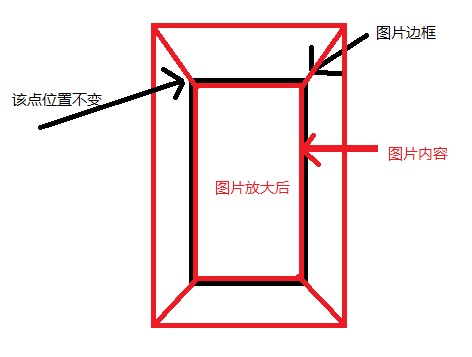
所以在缩放后要移动图片的位置的话,还是根据原图边框来处理的!
图片全屏:(这里为什么*1.01,是因为实际使用过程中,矩阵中出现的问题)
Matrix matrix = new Matrix();
matrix.postScale(canvas.getWidth()*1.01f/bmpBg.getWidth(), canvas.getHeight()*1.01f/bmpBg.getHeight(), bmpBg.getWidth() / 2, bmpBg.getHeight() / 2);
matrix.postTranslate( (canvas.getWidth()-bmpBg.getWidth()) / 2, (canvas.getHeight()-bmpBg.getHeight()) / 2);
canvas.drawBitmap(bmpBg, matrix, paint);
3、画布保存为图片
将图片进行编辑(放缩,涂鸦等),最后保存成指定格式、大小的图片
-
首先创建一个Bitmap图片,并指定大小
-
在该图片上创建一个新的画布Canvas,然后在画布上绘制,并保存即可
-
需要保存的目录File,注意如果写的目录如“/sdcard/akai/”如果不存在的话,要先创建(file.mkdirs()),否则FileOutputStream会报错No found
-
需要添加权限:
Bitmap bmp = Bitmap.createBitmap(480, 800, Config.ARGB_8888);
Canvas canvas = new Canvas(bmp);
canvas.drawBitmap(this.bmp, matrix, paint);
canvas.save(Canvas.ALL_SAVE_FLAG);
canvas.restore();

File file = new File("/sdcard/akai/");
if(!file.exists())
    file.mkdirs();
    try {
        FileOutputStream fos = new FileOutputStream(file.getPath() + "/2.png");
        bmp.compress(Bitmap.CompressFormat.PNG, 100, fos);
        fos.close();
        System.out.println("saveBmp is here");
    } catch (Exception e) {
                e.printStackTrace();
}
4、获取本地图片或者拍照图片
从SD卡中获取图片资源,或者拍一张新的图片。提示选择代码:
CharSequence[] items = {"相册", "相机"};
   new AlertDialog.Builder(this)
    .setTitle("选择图片来源")
    .setItems(items, new OnClickListener() {
        public void onClick(DialogInterface dialog, int which) {
            if( which == SELECT_PICTURE ){
                Intent intent = new Intent(Intent.ACTION_GET_CONTENT);
                intent.addCategory(Intent.CATEGORY_OPENABLE);
                intent.setType("image/*");
                startActivityForResult(Intent.createChooser(intent, "选择图片"), SELECT_PICTURE);
            }else{
                Intent intent = new Intent(MediaStore.ACTION_IMAGE_CAPTURE);
                startActivityForResult(intent, SELECT_CAMER);
            }
        }
    })
    .create().show();
处理图片
方法一,直接处理返回图片:
注释:
1、网上有说明,直接处理返回的图片是被系统压缩过的,不过自己在测试的过程并没有区别;
2、如果用户不断的重新获取图片的话,必须把现在的Bmp内存释放,否则会报错! bmp.recycle()。
protected void onActivityResult(int requestCode, int resultCode, Intent data) {
    super.onActivityResult(requestCode, resultCode, data);
    if(resultCode == RESULT_OK){
        //选择图片
        Uri uri = data.getData();
        ContentResolver cr = this.getContentResolver();
        try {
            if(bmp != null)//如果不释放的话,不断取图片,将会内存不够
                bmp.recycle();
            bmp = BitmapFactory.decodeStream(cr.openInputStream(uri));
        } catch (FileNotFoundException e) {
            // TODO Auto-generated catch block
            e.printStackTrace();
        }
        System.out.println("the bmp toString: " + bmp);
        imageSV.setBmp(bmp);
    }else{
        Toast.makeText(SetImageActivity.this, "请重新选择图片", Toast.LENGTH_SHORT).show();
    }

}
方法二,获得图片的地址再处理:
protected void onActivityResult(int requestCode, int resultCode, Intent data) {
    super.onActivityResult(requestCode, resultCode, data);
    if(resultCode == RESULT_OK){
        Uri uri = data.getData();
        String [] proj={MediaStore.Images.Media.DATA};
        Cursor cursor = managedQuery( uri,
                proj,                 // Which columns to return
                null,       // WHERE clause; which rows to return (all rows)
                null,       // WHERE clause selection arguments (none)
                null);                 // Order-by clause (ascending by name)

        int column_index = cursor.getColumnIndexOrThrow(MediaStore.Images.Media.DATA);
        cursor.moveToFirst();

        String path = cursor.getString(column_index);
        bmp = BitmapFactory.decodeFile(path);
        System.out.println("the path is :" + path);
    }else{
        Toast.makeText(SetImageActivity.this, "请重新选择图片", Toast.LENGTH_SHORT).show();
    }

}
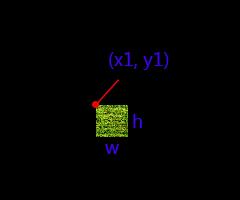
5、ClipRect局部绘图,切割原图绘制
Canvas的clipRect()接口的使用。(做游戏地图切片等)
- 选取要在画布上绘制(刷新)的区域,如图以(x, y)为起点坐标、宽w、高h的区域
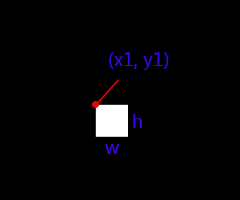
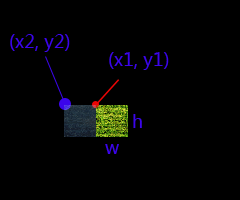
- 选择要绘制的图片,不一定是刚好宽高为(w,h),大图就需要切割了(本例子绘制绿色区域)

- 将图片绘制到画布上,使得绿色区域与白色方块重合
- 最后效果图
代码说明:
canvas.save();
canvas.clipRect(x1, y1, x1 + w, y1 + h);
canvas.drawBitmap(bitmap, x2, y2, paint);
canvas.restore();
1、save()先把画布的数据保存了(如matrix等),最后绘制完后再restore()则把中间对画布坐标等操作forget掉;
2、clipRect()截取画布中的一个区域;
3、drawBitmap()绘制图片到(x2, y2)上,则绿色部分刚好绘制到(x1, y1)上,而没有被clip的区域则不会绘图;
4、restore()最后要将画布回复原来的数据(记住save()跟restore()要配对使用)。
5、小小的代码,废话挺多的
6、Matrix零点一度的区别
Matrix是android中对图像绘制的处理(旋转、放缩、平移等等),书本翻页就是用这种方式处理的
最近遇到了个问题:
1、基于坐标(px,py)旋转degrees度, postRotate(float degrees, float px, float py)
2、基于坐标(px,py)进行按照(sx,sy)比例进行放缩, postScale(float sx, float sy, float px, float py)
以上两种方法都正常,但是当两者一起用的时候,在degrees为180度的时候,就有问题了。图像不能旋转180度了,反而是没有旋转的状态。
postRotate(180f, w/2, h/2);
postScale(0.48f, 0.48f, w/2, h/2);
Matrix: 180: Matrix{[-0.48, -0.0, 480.0][0.0, -0.48, 561.0][0.0, 0.0, 1.0]}
最后用了笨方法,用了180.1度就OK了,大学的线性代数也忘了差不多了,懒得去研究了。
postRotate(180.1f, w/2, h/2);
postScale(0.48f, 0.48f, w/2, h/2);
Matrix: 180.1f : {[-0.47999924, 8.3774904E-4, 479.68542][-8.3774904E-4, -0.47999924, 561.4186][0.0, 0.0, 1.0]}
以上,本文比较杂乱,都是以前在其他网站上写的,汇总成一篇了。
本文地址 http://www.0kai.net/blog/2014/11/17/3-android-draw-canvas.html,转载请注明!